




Pond Liner Installation Guide UK – Step by Step for All Liner Types
Share
Quick answer
Excavate and remove sharp stones, check the rim is level, lay 200gsm geotextile underlay, then centre the liner and fill slowly, smoothing folds and pleating corners. When full, trim to leave about 300mm round the rim and secure it under coping, turf or edging. Size the liner as length + (2 × max depth) + 0.6m.
Key facts
- Lay 200gsm geotextile underlay, ordered in the same size as the liner
- Overlap underlay joins by at least 300mm
- Liner size: length + (2 x max depth) + 0.6m; repeat for width
- Fill slowly from the centre and let water weight pull the liner into shape
- Trim to leave about 300mm round the rim, held under coping or turf
Last reviewed: · Reviewed by the PondLinersco.co.uk team
⚡ Quick Answer
To install a pond liner: excavate to shape removing all sharp stones, lay 200gsm geotextile underlay, drape liner centrally, fill slowly with water while smoothing folds, trim leaving about 30cm overlap, then secure edges. Wait at least 2 weeks and check water quality before adding fish. A medium 4m by 3m garden pond takes 2-4 hours to line correctly. View our pond liners →
✏️ Last updated: November 2024
Installing a pond liner correctly is the most important factor in how long it lasts. This guide covers every step — from ground preparation to filling — for all liner types.
Tools and Materials You'll Need
- Spade and wheelbarrow (excavation)
- Spirit level and string line (checking levels)
- 200gsm geotextile underlay (essential — same size as liner)
- Your pond liner
- Scissors or craft knife (trimming)
- Garden hose (filling)
- Coping stones or turf (edge finishing)
Step 1: Mark Out and Excavate
Mark your pond outline with a hosepipe or spray paint. Excavate to your planned depth, creating shelf zones at 15-20cm and 30-40cm for marginal plants. Remove all sharp stones, roots and debris. Rake the base smooth.
Step 2: Check Levels
Use a spirit level and plank to check the pond rim is level all the way around. Unlevel ponds look wrong when filled — water always finds its level. Adjust the excavation as needed.
Step 3: Lay the Underlay
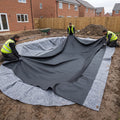
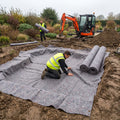
Lay 200gsm geotextile underlay over the entire pond — base and all sides. It should extend to the rim. Overlap joints by at least 30cm. This is the single most important protective step.
Step 4: Position the Liner
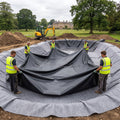
On a warm day (liner is more pliable when warm), drape the liner over the pond. Position it centrally — equal overlap on all sides. Avoid stretching at this stage.
Step 5: Fill Slowly
Begin filling slowly from the centre. The weight of water will pull the liner into the pond shape. Smooth out large creases and folds as the water rises. Do not stretch the liner to remove small creases — they will pull out naturally with more water.
Step 6: Pleat the Corners
For square or rectangular ponds, you'll need to fold the liner at corners. Make a single neat fold each side — like wrapping a parcel. EPDM and butyl are particularly forgiving here.
Step 7: Trim and Secure
When full, trim the liner leaving 300mm overlap around the rim. Fold this back under coping stones, turf, or stone edging. The weight of the edging holds the liner in place.
Step 8: Establish the Pond
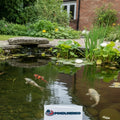
Leave the pond to stand for 48 hours before adding plants. Wait 2 weeks before adding fish — check pH is stable (6.5-8.0) first. Add pond bacteria to establish the nitrogen cycle before adding fish.
Tips for Specific Liner Types
EPDM: Warms up and becomes more flexible in sunlight — install on a warm day for easiest handling.
Butyl: The most forgiving for complex shapes — make gentle folds rather than sharp creases.
HDPE/LDPE: Lighter and easier to position solo. Less flexible — take extra care at corners.
PVC: Most rigid — best for straightforward shapes. Avoid sharp folds which can crease permanently.
Shop Pond Liners → | Pond Liner Calculator →
Related Pond Liner Guides
📚 Related Guides
Plan Your Pond Shape and Position
Mark out your pond shape using a hosepipe or spray paint. Consider:
- Sunlight — most aquatic plants need 4–6 hours of sunlight daily
- Trees — avoid overhanging trees (leaf fall, roots)
- Visibility — position where you can enjoy it from the house
- Level ground — sloped sites require more preparation
- Services — check for underground cables and pipes before digging
Calculate Your Liner Size
Use this formula:
- Length = Pond Length + (2 × Maximum Depth) + 0.6m
- Width = Pond Width + (2 × Maximum Depth) + 0.6m
The 0.6m gives a 30cm overlap on each edge. For a 3m × 2m pond, 0.8m deep, you need a liner of at least 5.2m × 4.2m, so choose the next size up that covers both dimensions. Order your underlay in the same size as the liner.
Prepare the Base
- If your soil is clay-heavy, compact the base firmly
- For sandy or very stony soil, add a 3–5cm layer of damp sand to the base and shelves
- Re-check levels after any base preparation
Common Mistakes to Avoid
- ❌ Skipping the underlay — the most common cause of premature liner failure
- ❌ Stretching the liner tight before filling — always allow slack
- ❌ Leaving the rim unlevel — creates visible liner on one side
- ❌ Ordering a liner that's too small — always size up
- ❌ Installing on a cold day — cold makes liners stiff and hard to mould
- ❌ Sharp folds at the pond rim — can weaken the liner material over time